Learn the process of how to add PAG oil to an AC condenser to boost your car's cooling efficiency. This guide outlines the steps on "How To Add PAG Oil To AC Condenser," making it a straightforward task.
We will cover how to locate the condenser, the tools required, and the amount of PAG oil needed. Through simple and safe instructions, this article explains the process for DIY enthusiasts, ensuring your AC condenser operates optimally with the right amount of PAG oil.
Step-by-Step Guide: How to Add PAG Oil to Your Car's AC Condenser
Adding oil is advisable when swapping out parts like a condenser in your car's AC system. Looking to add Polyalkylene Glycol (PAG) oil? We've researched the topic to give you the needed info.
Here's how to add PAG oil to the AC condenser:
- Shut off the engine.
- Find the AC compressor.
- Take off the tire near the compressor.
- Remove the protective cover.
- Loosen the compressor belt.
- Unplug the compressor's wire connector.
- Disconnect the pressure lines on the compressor valves.
- Hook up the reclaimer to the compressor valves.
- Take out the compressor.
- Empty the old oil from the compressor.
- Pour in the PAG oil.
- Put the compressor back.
- Reattach the reclaimer to the compressor valves.
- Reconnect the pressure lines on the compressor valves.
- Plug the compressor's wire connector back in.
- Refit the loose belt.
- Replace the protective cover and the tire.
- Test out the compressor.
In this guide, we will explore the listed steps further. We will also discuss the amount of oil needed for the AC condenser. Keep reading for more.

How To Add PAG Oil To Your AC Condenser?
Adding oil to your car's AC system helps the condenser work properly. If you don't own a reclaimer machine to remove freon from the system, it's best to get a professional to do it.
If you have the skills and a reclaimer machine, start by collecting the freon to prevent it from harming the environment—releasing it is illegal in many places.
Next, remove the compressor, drain the old oil, refill it with PAG oil, and reattach it to your car. Now, use the reclaimer machine to put the freon back in. Below are the steps for adding PAG oil to your AC condenser.

1. Turn Off The Engine
First thing first, turn off the engine because if you remove the compressor while the engine is running, you can shock yourself. Make sure that the car is parked on level ground.
2. Locate The AC Compressor
Then, find your AC compressor by opening the hood and looking toward the front on the left side of the car. Look for a silver metal cylinder with tubes, belts, and wiring attached to it. Or check behind the large tubing that might only block your view of the compressor.
3. Remove The Tire Close To The Compressor
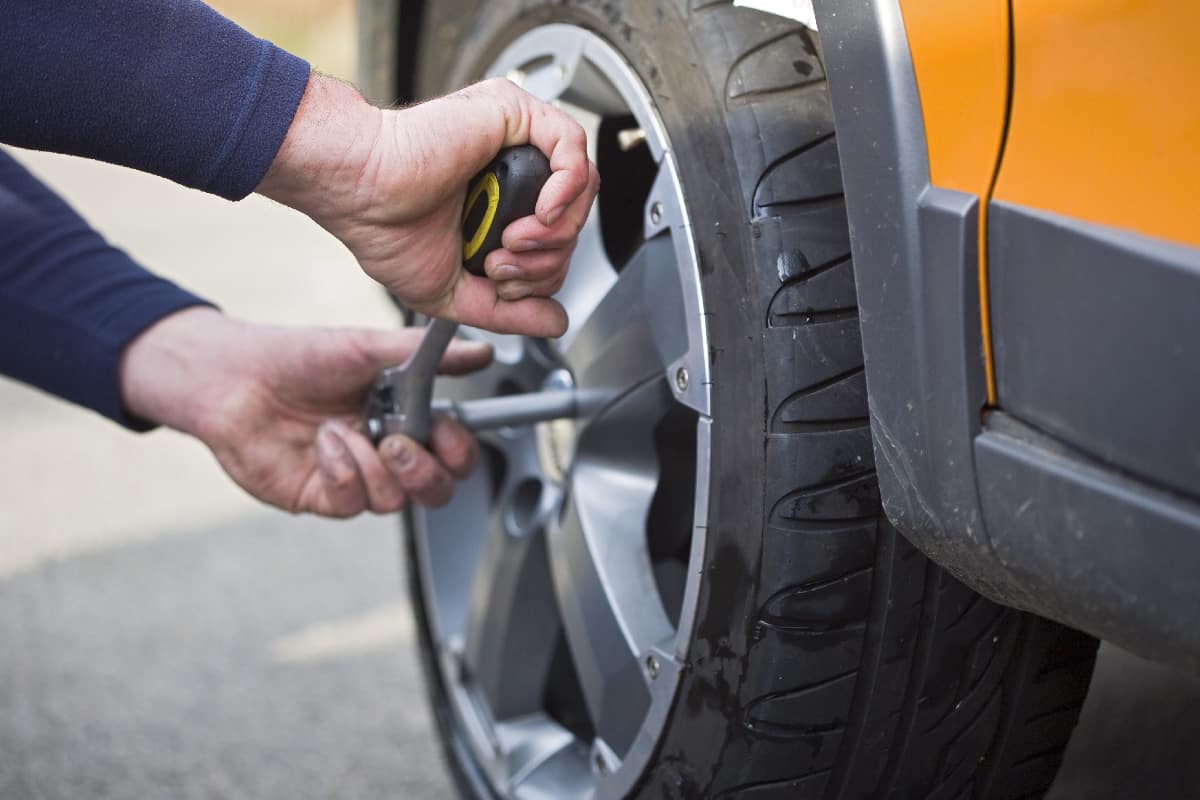
Put a car jack underneath a jack point on the car's frame, close to the front tire. To reveal the AC compressor, use a tire iron to remove the tire and place it elsewhere. The engine's compressor's protective cover should be visible above the tire well.

Check out this car jack on Amazon.
4. Remove The Protective Covering
To remove the mounting bolts from the cover of the AC compressor, use a socket wrench. Remove the vehicle's covering and store it somewhere else to be reinstalled later. Also, ensure that none of the bolts is lost.

Check out this socket set with a ratchet on Amazon.
5. Loosen The Belt Of The Compressor
You can see a belt and pulley system on the compressor. To enable you to loosen the belt, use a wrench to remove the nut from the pulley's outside. To make it simple to replace the belt later, slide it off the pulley's side. Keep the nut attached to the pulley. Just enough to make the belt lose.

Check out this wrench on Amazon.
6. Disconnect The Compressor's Wire Connector
A plastic wire will be attached to the compressor's power supply. When disconnecting a wire from a compressor, grab the connection point and pull the wire out. Sometimes, you might need to press down on a plastic tab at the connection site to separate the wire. To reattach it easily later, let the wire hang loosely from the car.
7. Disconnect The Pressure Lines On The Compressor’s Valves
There are two lines exiting the compressor's back: the high- and low-pressure lines. The high-pressure line is the thin line, while the low-pressure line is the bigger line.
Remove the bolts holding the pressure lines to your compressor together, then disengage them from the compressor's valves.
8. Connect The Reclaimer To The Compressor’s Valves
Lift the tab on the valves from the reclaimer machine, slide them onto the pressure valves (high and low-pressure valves) of the compressor, and then push them closed.

Check Out This Reclaimer Kit On Amazon
Turn the compressor valves open and turn on the reclaimer machine to capture the freon. Run the machine until the pressure gauges indicate that the compressor is empty.
Turn off the reclaimer machine, close the valves, and detach them from the compressor.
9. Remove The Compressor
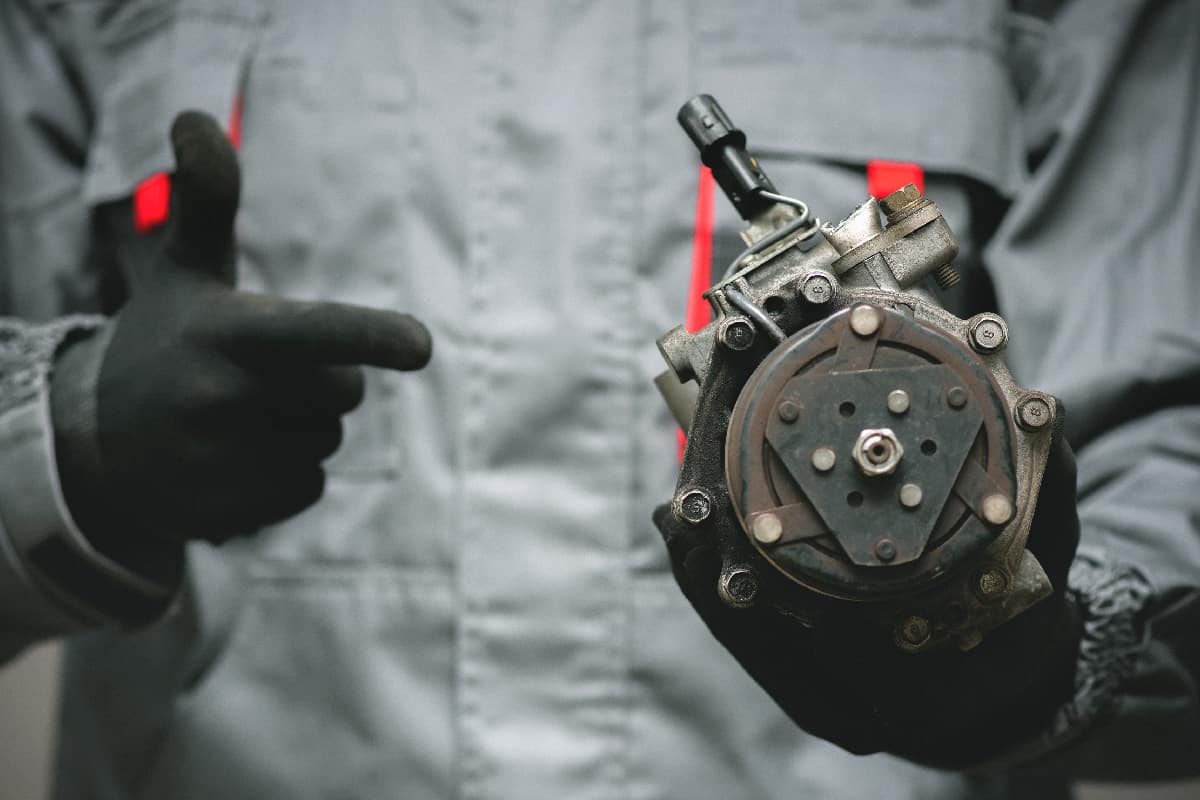
Use a wrench to remove the four mounting bolts holding the compressor to the car once all lines, wires, and belts have been detached. Either from the engine's top or the bottom, remove the compressor.
10. Drain The Old Oil From The Compressor
Remove the cap from the compressor and then hold the compressor upside down to empty all of the old oil from it. A compressor that still has oil in it can overflow if additional oil is added, which could harm the compressor or make it problematic after installation.
11. Add The PAG Oil
Keep the compressor in a vertical position with the open end pointing up. Slowly pour the necessary quantity of PAG oil using a funnel that fits the entrance. Then, tighten the rear cap with a wrench to secure it. After that, hold the compressor in one hand and rotate the clutch plate many times to work the oil into the compressor's internal workings.

Check out this PAG oil on Amazon.
12. Return The Compressor
Put the compressor back where it was originally mounted. To ensure that the compressor is stable and won't move, install back the mounting bolts with a wrench and tighten them well.
13. Reconnect The Reclaimer To The Compressor’s Valves
Reconnect the reclaimer machine to the compressor, the same process on the eighth step. With the reclaimer machine connected, open the compressor’s valves, then open the reclaimer’s valves counterclockwise.
Turn on the reclaimer after setting it to the restore setting. Until the tank is already empty, turn off the reclaimer, close the valves and unplug them from the compressor.
In terms of restoring the freon to the compressor, a video on YouTube is shown below.
14. Reconnect The Pressure Lines On The Compressor’s Valves
Reinsert the high-pressure and low-pressure lines into the compressor. Put back the bolts over the lines using the wrench and tighten them so they are held firmly in place.
15. Reconnect The Compressor's Wire Connector
Push the two wire connector sides together after aligning them. To ensure that the wires are attached and won't come undone, tug lightly. Once the wires are attached, you can hear a "click" or "snap."
16. Put The Loose Belt Back
Reposition the slack belt over the compressor's pulleys to where it was before. Once the belt is taut, use a wrench that fits over the pulley's nut to tighten it.
17. Return The Protective Covering And The Tire
Slide the bolts into their slots while holding the plastic covering in place. Then, tighten the bolt using a wrench. Reinstall the tire to the car and tighten each nut with a tire iron.

Check out this tire iron on Amazon.
18. Test The Compressor
Remove the jack, slide it beneath the car and the car back to the ground. Ensure the compressor is operating by turning on the engine and watching if the compressor belt spins. The compressor is working properly if the air conditioner can produce cold air.
A YouTube video is displayed below for you to observe how all those processes were carried out.
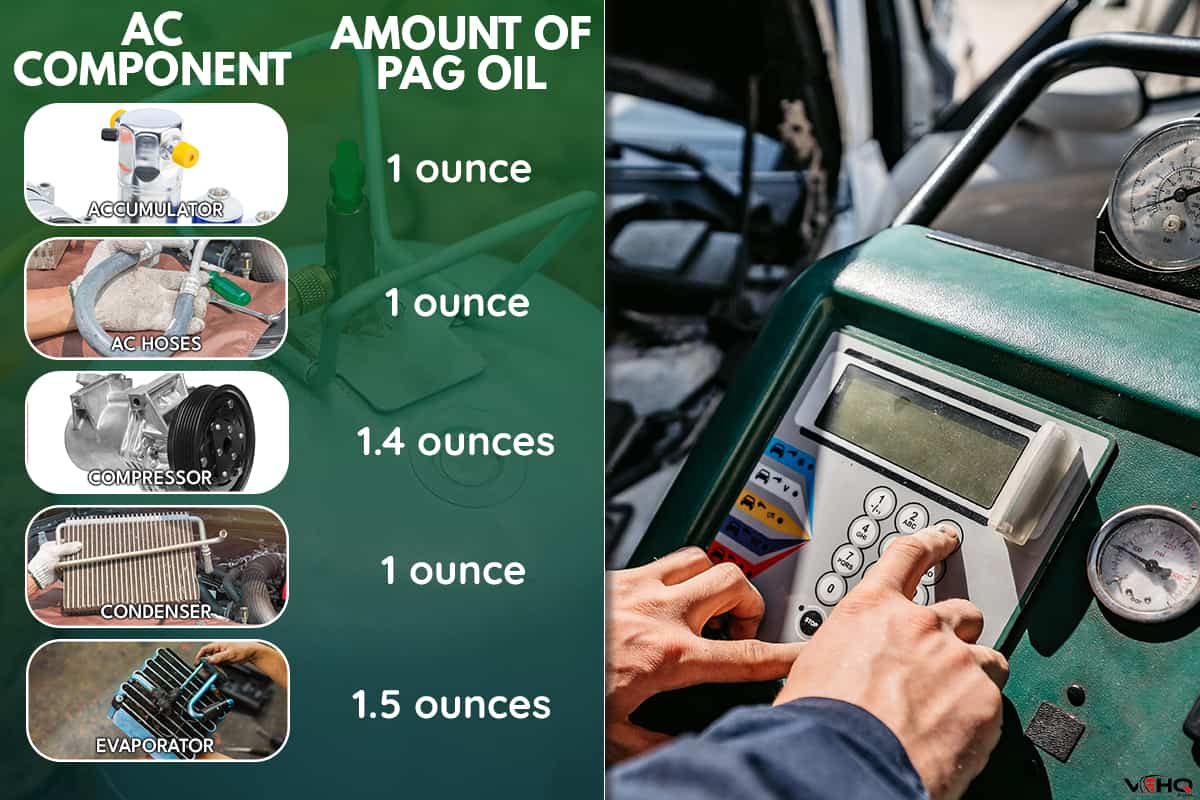
Understanding Oil Distribution in Your AC System
When adding PAG oil to your car's AC system, it's crucial to understand how the oil is distributed among different components. The compressor, condenser, and evaporator all require a certain amount of oil to function correctly.
Typically, adding oil to the compressor allows it to circulate through the system, reaching the condenser and other parts. However, when replacing components like the condenser, adding some oil to the new condenser could be beneficial to ensure optimal performance.
Here's a rough guide on oil distribution among the components:
- Compressor: 1.4 ounces
- Evaporator: 1.5 ounces
- Condenser: 1 ounce
Too much oil can hinder the cooling performance, while too little can cause damage to the compressor. Hence, maintaining the right oil balance is crucial.
How Much Oil Do I Put In A New AC Condenser?
Your vehicle's user manual will suggest a precise volume of refrigerant oil. Additionally, the specifications of the AC unit itself show how much oil it needs. As a general rule, you can use four ounces of oil, but you should consult the owner's manual to be safe.
There are also stickers on the railing that your car's hood encloses or under the hood. These labels frequently contain information about refrigerants, like the kind of refrigerant to use, the best oil to buy, the suggested doses, and warnings about things to avoid.
However, the best thing to do is to get in touch with the maker of your A/C compressor to find out the precise amount needed. It's important to avoid overfilling the system with oil, as this can lower performance. Nevertheless, adding insufficient oil will cause compression failures by raising the temperature and friction.
R134a refrigerant is used in the majority of vehicles manufactured after 1996. This type's compressor system uses PAG oil. This standardization has made it simpler to determine how much oil to apply to each AC component:
Since the entire amount of oil applied is typically four ounces, the total amount of oil in all the components shouldn't be more than it. The capacity of the AC system oil in your vehicle will determine this number.
Wrapping Up: How Much PAG Oil to Add to an AC Condenser
When adding PAG oil to your AC condenser, precise measurement matters. Putting in too much oil can actually lower system performance and cause issues. Not enough oil leads to compressor failure from increased heat and friction.
Your vehicle's owner's manual or AC unit specifications will recommend the exact oil amount needed. A general guideline is 4 ounces, but confirm the right quantity for your make and model. Overfilling with PAG oil creates problems, so be careful to measure properly before adding it to the AC condenser.
Rather than risking incorrect DIY oil amounts, you can always have an experienced auto technician handle this AC maintenance task. Proper PAG oil levels keep your AC system running optimally over the long haul.
For more AC-related articles, check out below.
So is it sufficient to add oil to the compressor only? No need to add oil directly to the condenser?
Hi Benjamin! Thanks for bringing it up. We have added a short section to answer your question.
Typically, adding oil to the compressor allows it to circulate through the system, reaching the condenser and other parts. However, when replacing components like the condenser, adding some oil to the new condenser could be beneficial to ensure optimal performance.
Here’s a rough guide on oil distribution among the components:
Compressor: 1.4 ounces
Evaporator: 1.5 ounces
Condenser: 1 ounce