You recently refueled your Harley Davidson, butthe gauge still says that the motorcycle’s gas is close to empty. What could be the cause of this issue? We searched for the answer to this concern for your convenience, and here’s what we found.
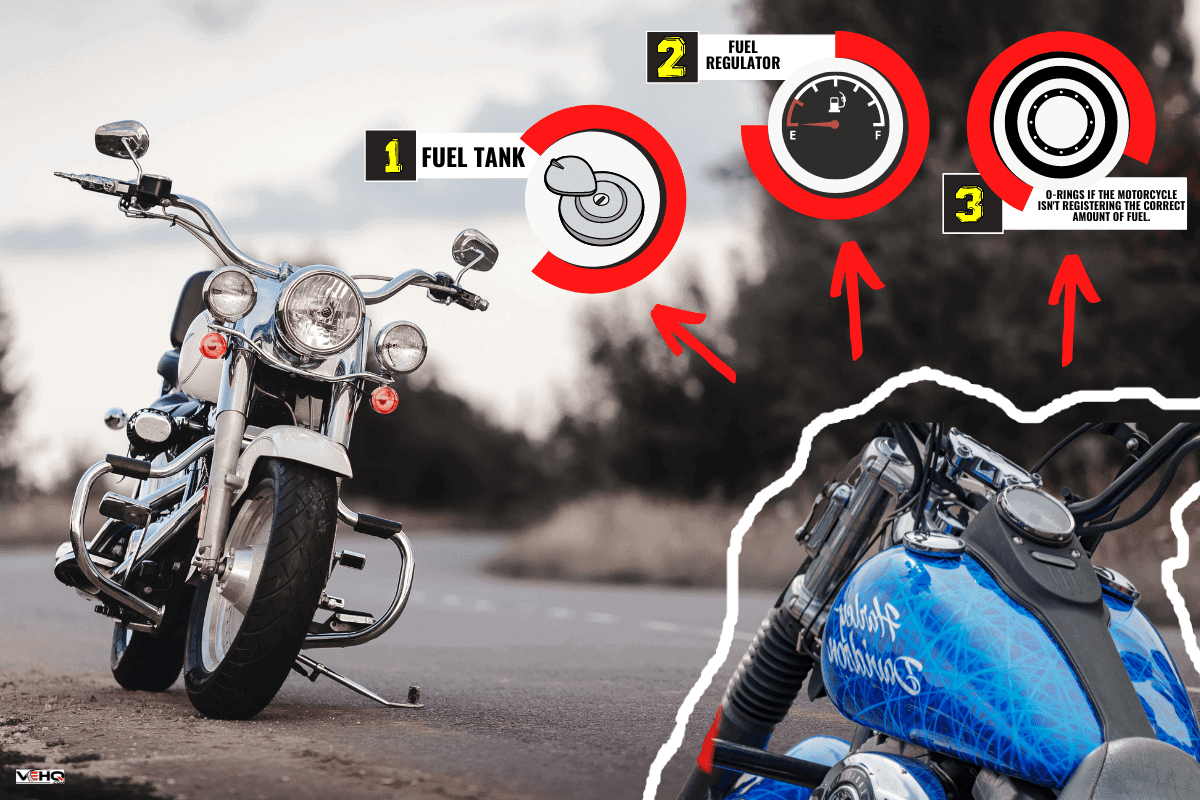
Inspect your Harley Davidson's fuel tank, fuel regulator, and O-rings if the motorcycle isn't registering the correct amount of fuel. Faults from these components are the likely suspects in this problem. Once you find the source of the issue, use the appropriate method based on your findings to fix the issue at its source.
You should continue reading as we talk about the possible reasons why your Harley Davidson isn’t getting fuel in greater detail. We’ll also discuss some DIY solutions that may help restore your motorcycle’s normal functions.
Reasons Why Harley Davidson Isn’t Getting Fuel
Worn O-Rings
Generally, O-rings are circular-shaped gaskets used to seal different openings in your Harley Davidson. You can find these seals in areas like the fuel pump and filter. But these rubber seals may wear out over time, resulting in fuel leaks.
Fuel Tank Hole
An external force might create a hole in your Harley Davidson’s fuel tank. The resulting leak can prevent the reservoir from allowing the motorcycle from keeping the recommended amount of gas.
Warning: Don’t attempt to weld a hole in your Harley Davidson motorcycle’s fuel container. Also, avoid placing flammable objects near the vehicle at this time. These actions may cause an explosion, putting you, the vehicle, and other nearby people at risk of experiencing serious accidents and injuries.
Faulty Fuel Regulator
A fuel regulator is a component typically connected to other parts like the fuel tank, gas filter, and supply pump. Generally, this part functions by controlling the fuel going from the tank to the engine. A faulty fuel regulator may result in the Harley Davidson’s engine being unnable to get sufficient gas from the tank.
Other issues that may occur because of a bad fuel regulator are:
- Vehicle misfires
- Black smoke from the exhaust
- Fuel leaks
- Reduced fuel economy
- Poor motorcycle performance
How To Replace A Fuel Regulator In My Harley Davidson?
Take note that it’s best to replace the fuel pump and filter along with the regulator. That way, you can reduce other potential hazards from appearing.
Ensure that the upcoming task won’t pose a threat to your well-being. Follow these safety measures before you proceed with the replacement operation:
- Wear a respirator. Inhaling the fumes from the motorcycle’s fuel tank and lines for extended periods may lead to serious problems.
- Wear safety gloves and long-sleeved clothing. Avoid direct contact with harmful chemicals from the vehicle with your skin.
- Drain the fuel tank. Remove leftover gas from the Harley Davidson’s fuel reservoir to prevent possible combustions.
- Place a sign near the workstation. It should warn passers-by about the possible dangers when walking in and around the area.
- Store equipment and materials immediately after using them. Don’t leave items in your walking path, which may otherwise lead to falls.
After completing the preventive measures, continue the procedure by following these steps:
What You’ll Need
- Socket and ratchet set
- Wrench set
- Flathead screwdriver
- Replacement fuel pump regulator
- Replacement main fuel pump unit kit
- Oil drain pan
- Cloth, rag, or towel
Step-By-Step Guide
Step #1: Park The Motorcycle
Park your Harley Davidson in a shaded area. If you can’t drive the motorcycle, try to push it until you reach a safe location. Ensure that the parking spot has flat and level ground. One example of an ideal place to work on the vehicle is a garage.
Step #2: Expose The Fuel Pump
Open the motorcycle’s seat to expose the battery. Then, disconnect the negative battery cable from its terminal.
Next, remove the nut and washer from the vehicle’s center cover. Proceed by removing the screws on the cover’s side. Remove the bolt holding the cover in place afterward. Pull out the cover and set it aside temporarily.
Note: Place the fasteners in a safe yet fairly obvious location, as you’ll need them for the reassembly.
Step #3: Remove The Fuel Pump
Remove the bolts securing the fuel pump assembly. Slightly lift the fuel pump and detach its hose clamp with the help of a flathead screwdriver. Then, gently remove the old fuel pump from the motorcycle and place it in a reasonably large oil drain pan or a similar container.
Tip: Place a cloth, rag, or towel surrounding the fuel tank. That way, you can keep the vehicle clean from gas drippings.
Step #4: Replace The Parts
Unclamp the old fuel pressure regulator and pull it out of its mount afterward. Next, detach the old fuel pressure regulator from its connections and install the new unit. Replace the O-ring if necessary.
Then, install the main fuel pump unit to the assembly’s mount. Make sure to follow the product manufacturer’s instructions during this part of the installation. Also, ensure that the connection with the main fuel pump’s line with the regulator is secure.
Tip: You can secure the main fuel pump unit with a zip tie. That way, it shouldn’t sway or rattle while you’re driving the motorcycle.
Step #5: Return The Fuel Pump Assembly
Return the fuel pump assembly to the motorcycle, but this time it should have the replacement parts. Don’t forget to pay attention to the assembly’s orientation when reinserting it into the Harley Davidson’s center area.
Next, secure the new fuel pump assembly by screwing its bolts into place. Return the center console’s cover afterward and secure that assembly as well.
Step #6: Refuel The Motorcycle
Pour a fresh batch of fuel into the Harley Davidson’s fuel tank. Observe the gas in the tank to check for potential leaks. Close the gas tank's cover if the liquid is stable.
Then, turn on the motorcycle and inspect the fuel gauge. Check if the refueling registered properly. Turn on the engine afterward and allow it to idle while you’re keeping an eye on the fuel gauge. This replacement project is complete if the fuel gauge remains relatively stable while the motorcycle’s engine is running.

Check out this replacement fuel pump regulator for Harley Davidson on Amazon.
You can also watch this video for a visual guide to the steps mentioned above:
How Long Does It Take To Replace A Fuel Pressure Regulator In A Harley Davidson?
Generally, it should take about 5 hours to replace a fuel pressure regulator on a vehicle. But an experienced technician, particularly one with expertise in handling Harley Davidsons, should only take approximately 1 hour to finish the replacement job.
How Much Should It Cost To Replace A Fuel Pressure Regulator In A Harley Davidson?
Generally, it costs about $146 to $178 to purchase new fuel pressure regulators for vehicles, which may include Harley Davidsons. Taking advantage of professional services to replace the old regulator in your vehicle may increase the overall costs by $119 to $146.
How To Stop Harley Davidson Fuel Tank From Leaking?

Take note that you may need to remove the paint near the offending area on your Harley Davidson’s fuel tank cover. That also means you might need to repaint the cover after completing this repair job.
Proceed with this operation by following these steps when you’re ready:
What You’ll Need
- Garden hose
- Air compressor
- Automotive lubricant
- Rubber fuel tank seals
- Soldering fluid
- Blow torch
- Automotive painting kit
Step-By-Step Guide
- Empty leftover fuel from the gas tank.
- Rinse the inside of the fuel tank with water from a garden hose. Repeat this step multiple times until you can’t smell the stench of fuel from within the reservoir.
- Dry the fuel tank with air from an air compressor. You can also let the fuel tank air dry but it can take a long while before you can proceed to the next step.
- Apply lubricant to the rubber seals of the Harley Davidson’s fuel tank. Replace these seals if they’re in bad shape.
- Coat the crack or hole with soldering fluid.
- Apply sufficient heat from a blowtorch to melt the soldering fluid and seal the imperfection.
- Wait for the melted fluid to cool before repainting the offending area.
- Refill the Harley Davidson’s gas tank.
- Check if the leak persists and inspect the fuel gauge if it now registers the newly poured gas in the tank.
Watch this video to gain additional insights into this procedure:
Final Thoughts
Remember to troubleshoot your Harley Davidson before attempting to repair it. Find the main cause of your motorcycle not getting sufficient fuel, even after refilling its gas tank. Once you find the primary reason for the problem, you may continue to fix it with the appropriate DIY method or seek professional help.
If you’re looking for answers to other Harley Davidson concerns, check out these other great reads:
Harley Davidson ABS Light Flashing – Why? What To Do?
Why Does My Harley Davidson Pop On Deceleration? What Could Be Wrong?