Are you planning to upgrade the steering wheel on your Super Duty truck to a leather steering wheel for a more comfortable drive? And do you want to know how to remove the old steering wheel? You’ve come to the right place, for we have researched this question, and we have the answer for you.
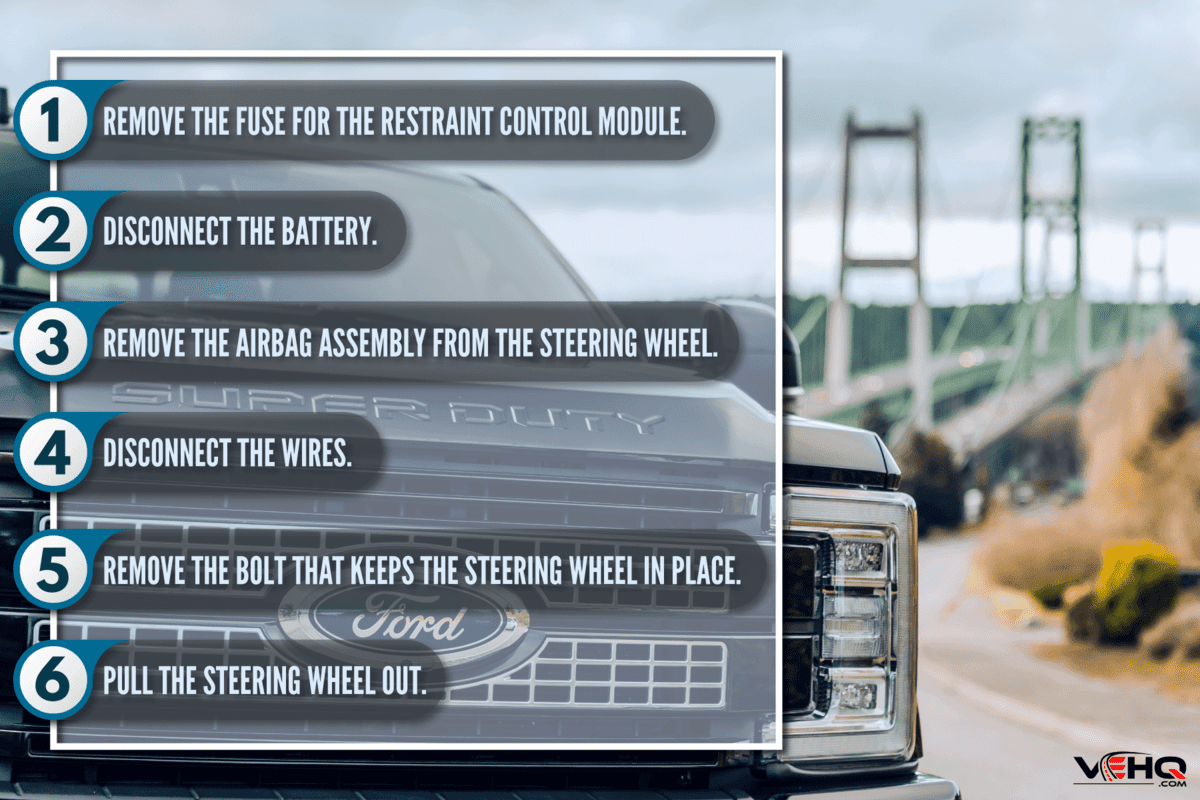
Here is a summary of the steps that you can follow to remove the old steering wheel on your Super Duty truck.
- Remove the fuse for the restraint control module.
- Disconnect the battery.
- Remove the airbag assembly from the steering wheel.
- Disconnect the wires.
- Remove the bolt that keeps the steering wheel in place.
- Pull the steering wheel out.
Let’s talk more about replacing the steering wheel of your F-250 in the succeeding sections. Learn how to install a protective cover for the steering wheel of your Super Duty truck to protect it from wear in the sections below.
Read on!
The Steering Wheel Of Your Super Duty Truck
The steering wheel of Super Duty trucks commonly has a vinyl cover. Older models have a rubbery cover that is less durable.
The primary objective of a Super Duty truck is to put in heavy work, so it is not uncommon for the steering wheel to wear out from daily heavy-duty use. You will eventually need to replace it.
In some cases, you might opt for a protective cover. A leather cover will make your steering wheel more comfortable and look stylish in addition to protecting it.
Can’t wait to learn how?
Jump to the next section to find out how.
How to remove steering wheel in Super Duty trucks?
Here is the complete set of steps for removing the steering wheel in your Super Duty trucks.
Preparing Your Truck

- Park your truck on solid and level ground.
- Activate the parking brake. Without the ability to steer your truck when it slides, the brakes are the only thing that you can rely on to prevent hitting anything.
- Set the transmission to Park(P).
- Move your steering wheel until it is in the center. This will make it easier for you to install the replacement steering wheel later.
- Turn off the engine.
Disabling The SRS Airbag Control Module
It’s important to disable the SRS (Supplemental Restraint System) Airbag Control Module before proceeding. The SRS Airbag Control Module controls the deployment of the airbags in the event of a collision. The module can interpret the removal of the steering wheel as a sign of a collision and trigger the airbag’s deployment.
Disabling the SRS module will prevent the airbag from activating while you’re removing the steering wheel.
- Check the owner’s manual or the user repair manual of your Super Duty truck for the location of the fuse blocks.
- Find out which fuse protects the circuit of the SRS module in the manuals.
- Open the hood of your truck.
- Open the fuse block and look for the fuse that protects the circuit of the SRS module. There should be a sticker inside the cover of the fuse block that shows you the position of the fuses.
- Use a needle nose plier to pull the fuse out.
- Use a socket wrench to loosen the bolt that secures the cable of the battery to the negative battery terminal.
- Remove the power cable from the negative terminal of the truck battery.
-
- Disconnecting the battery will prevent the continuous electrical power supply from reaching the SRS module.
- Removing the fuse ensures that any leftover charge inside the car will not make it to the SRS module.
- Place a rag to cover the negative terminal of the battery. This will prevent any accidental contact with the negative wire.
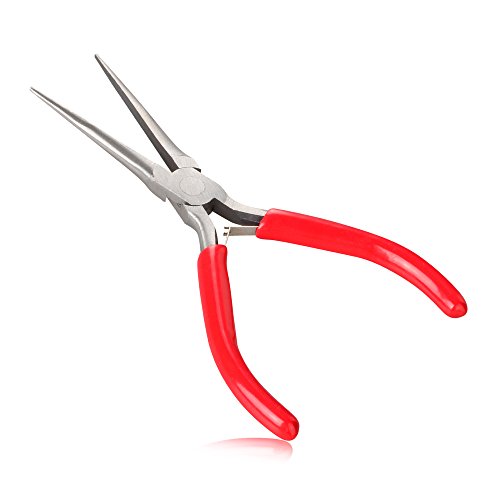
Dykes Needle Nose Pliers is available on Amazon through this link.

The DEWALT Socket Set is available on Amazon through this link.
Removing The Airbag Assembly
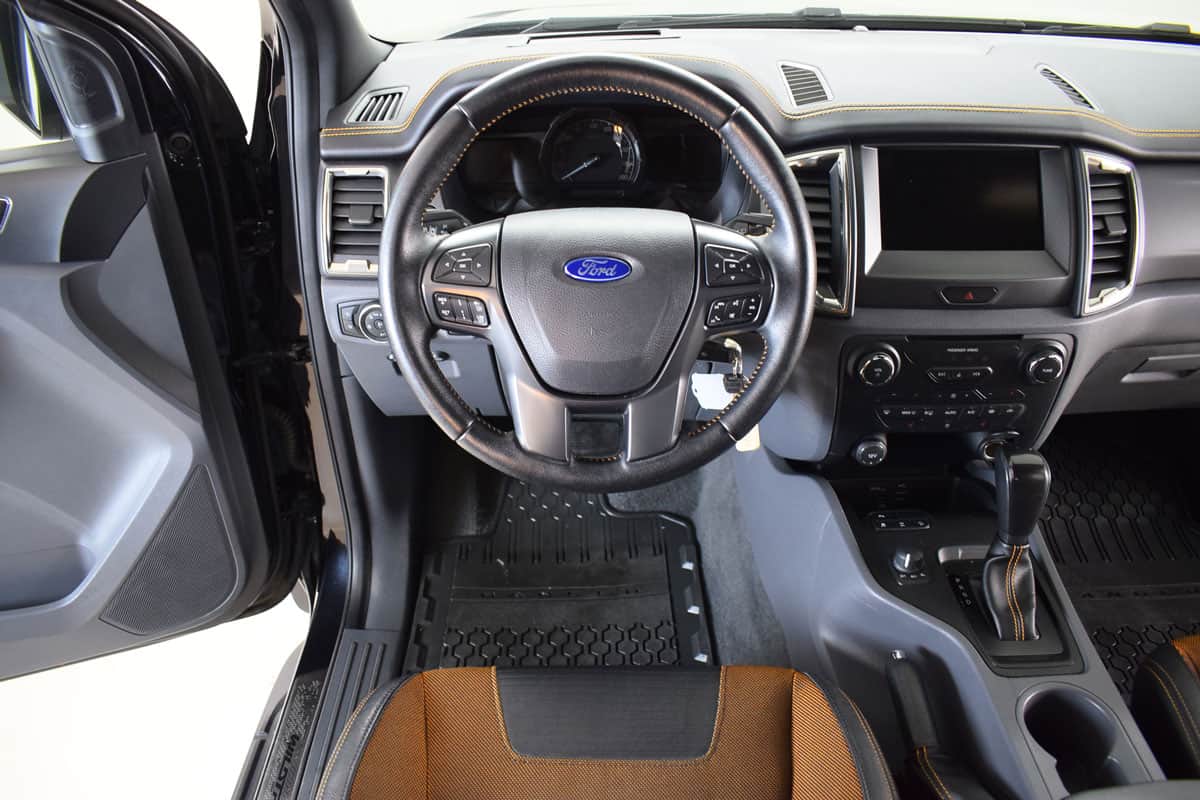
- Locate the small holes on opposite sides of the base of the steering wheel. Some models have a base that has a leather cover, and the leather will hide the holes. However, there will be slits in the leather to access these two holes. Moreover, there are older models of Super Duty trucks that have four of these holes (two on each side) instead of just two.
- Insert a long thin object like a screwdriver into the hole. The distance of the lock from the hole is different depending on the model of the Super Duty truck.
- Move the screwdriver around inside the hole and feel around for a lever that you can push with the screwdriver.
-
- If you don’t feel anything with the screwdriver inside the hole, then it might not be long enough to reach the lever. In this case, get a longer screwdriver or a long rod to reach and push the lever.
- Pressing the lever will loosen that lock on the airbag assembly. Pull that part as the lock loosens. Pulling that side out will disengage that lock and allow you to work on the other locks.
- Repeat the steps above to loosen the other locks until you unlock the airbag assembly.
-
- If a lock slides back into place, you will have to loosen and undo that lock once more.
- Carefully pull the airbag assembly and separate it slightly from the steering wheel. Lifting the airbag assembly will give you access to the wires inside the cavity under the airbag assembly.

Slotted and Phillips Screwdriver is available on Amazon through this link.
Disconnecting The Wires
- Use a plastic trim remover to pry the lock loose on the yellow connector. Pull the tab lock up to release the wire connector. Remove the wire connector and move it to one side.
-
- Using a plastic trim remover to pry the locks will help prevent you from breaking any of the plastic locks on the electrical harnesses.
- Do the same thing to remove the light blue wire connector that looks like the first one.
-
- These two wires connect to the airbag assembly. Although they look the same, match their color to the socket when you reconnect them.
- Pry the lock off the red connector on the side of the steering wheel. This wire harness connects to your horn.
- Removing these three wire connectors will allow you to remove the airbag assembly. Set the airbag assembly aside.
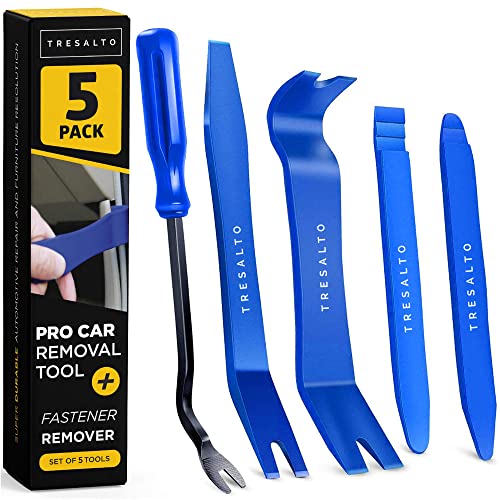
Tresalto Auto Trim Removal Tool Set is available on Amazon through this link.
Removing The Steering Wheel
- Check the top center of the steering wheel. Some wires go to one or two wire connectors. Use the trim remover tool to pry the lock on these wire connectors to loosen them.
- Pull out the wires from the top of the steering wheel.
- Remove the center bolt that keeps the steering wheel in place.
-
- You might need to ask someone to hold the steering wheel while you loosen the bolt.
- Alternatively, you can use one hand to support an impact gun to loosen the bolt while your other hand can hold the steering wheel steady.
- The center stud bolt on the steering wheel has a center notch that tells you where the top and center of the steering wheel should be. This notch can be at the bottom center in some older Super Duty models.
How to stitch a leather steering wheel cover?

- Follow the instructions above to remove the steering wheel. Alternatively, you can stitch the leather steering wheel cover even without removing the steering wheel. However, it will be more difficult to stitch a protective leather cover while the steering wheel is still on your Super Duty truck.
- Flip the steering wheel cover inside out.
- Place strips of double-sided tape on the inside of the leather cover. You only need to place the double-sided tape around the edges of the four corners of the steering wheel cover.
- Flip the steering wheel cover back to its original position.
- Position the steering wheel cover on the steering wheel.
- Reposition the steering wheel cover to make sure that it is in the center of the steering wheel.
- Peel off the double-sided tape bits and press that area firmly on the steering wheel.
- Smoothen the steering wheel cover where you have the double-sided tape.
- If the leather cover kit did not include a thread, or you just want to use your thread, use bonded nylon or bonded polyester thread. Bonded nylon and bonded polyester thread are best for stitching leather. Pick a thread color that you’d like to use.

AULLY PARK Universal Car Steering Wheel Cover is available on Amazon through this link.

Mandala Crafts Tex 70 Bonded Nylon Thread is available on Amazon through this link.
Stitching The Leather Cover
- Cut a length that is 6 to 7 times the length of the steering wheel section that you will stitch.
- Insert the thread into the needle.
- Start stitching at the part of a section where the leather closes. Start stitching by inserting the needle into the pre-existing hole.
- Make a starting knot.
- Continue stitching by inserting the needle into the existing holes or through the existing threads. Pull to tighten the thread as you go along.
- Make a knot when you reach the end of the panel.
- Repeat the same process to stitch the leather cover of the other panels.
Conclusion

Remember to turn off the airbag before removing the steering wheel, and install the airbag correctly after installing the new steering wheel.
If you found this article interesting, why not check the two articles below too:
Ford Steering Wheel Button Controls Not Working – What To Do?
Is It Safe To Drive With A Shaking Steering Wheel? [Here’s What You Need To Know!]