Are you losing refrigerant in your car, and do you want to know how to stop it from leaking? You’ve come to the right place, because we've researched this question and have the answer for you.
You can use a car AC leak sealant that you pump into the low-pressure valve to stop your car’s AC system from leaking.
Let’s talk more about sealing the refrigerant leak in your car in the succeeding sections. Learn how to recharge the refrigerant of your car easily in the sections below. Read on!
How Does Refrigerant Produce Cold Air In Your Car?
There was a time when car air conditioning was an optional feature in cars. Early car air conditioners were large and bulky. Eventually, more efficient air conditioning systems came out.
A modern air conditioner cools the air through the changes that the refrigerant undergoes while traveling back and forth inside the air conditioning system.
The key component of modern air conditioning systems in automobiles is refrigerant. The refrigerant is a chemical compound that easily changes from liquid to gas and vice versa.
The process of cooling your car starts inside the compressor.
The Compressor
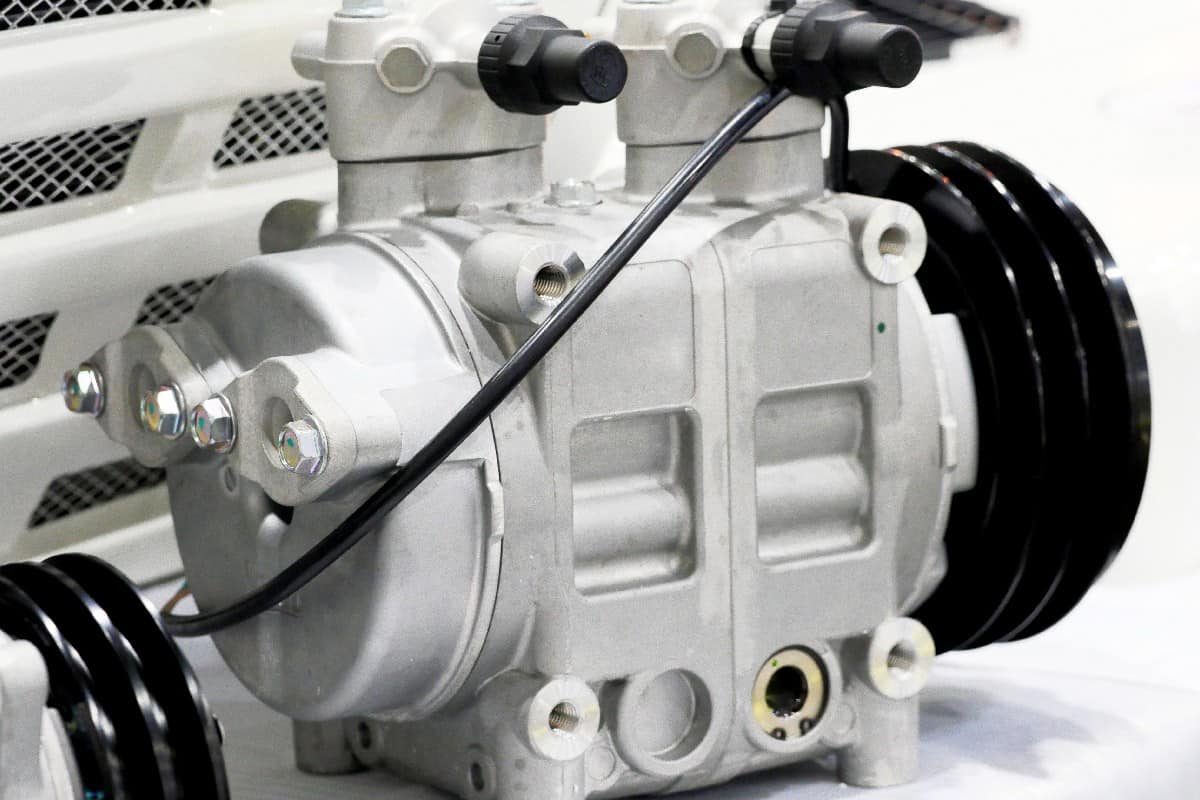
The compressor is a belt-driven component inside the engine bay. It looks like the alternator but has two metal tubes coming out of it. It has a pulley that connects to the serpentine belt of the engine.
The serpentine belt draws power from the rotation of the crankshaft. Power from the serpentine belt goes to the different components of the car, like the compressor.
The compressor sucks in refrigerant in gas form. When the refrigerant initially enters the compressor, it has low pressure. The compressor compresses the gaseous refrigerant and turns it into a high-pressure gaseous refrigerant.
Any increase in pressure produces a corresponding increase in temperature. Therefore, the gaseous refrigerant’s temperature also increases as it leaves the compressor.
This increase in pressure and temperature is important because the refrigerant should be hotter than the surrounding air—wherever you might be driving.
The Condenser
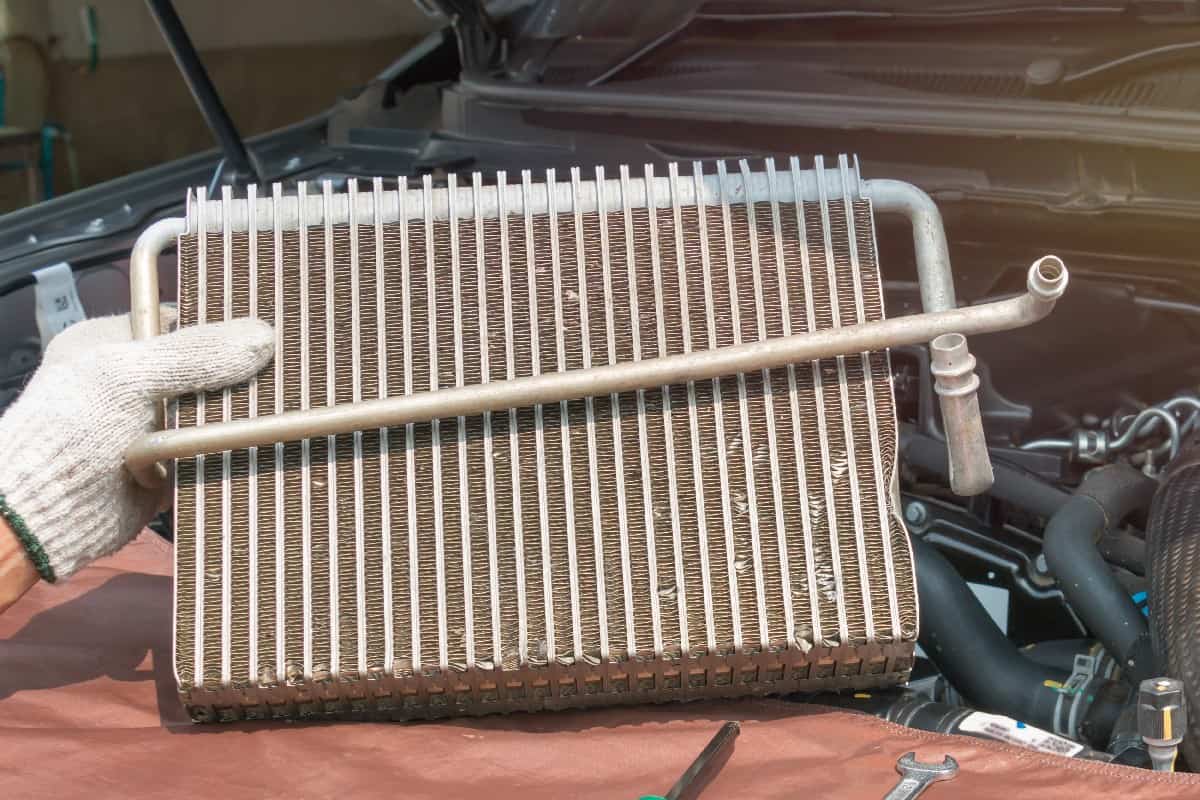
The condenser is a small radiator-like component that receives the high-pressure gaseous refrigerant from the compressor. When the refrigerant enters the condenser, it must be hotter than the surrounding air.
The air that passes through the fins of the condenser should be able to cool the refrigerant that passes through the tubes of the condenser. The cooling effect is necessary to turn the refrigerant into a high-pressure liquid state.
If the refrigerant charge is low, the refrigerant can fail to turn into liquid when it passes through the condenser. This causes a major drop in the efficiency of the AC system of your car.
Dryer
Once the high-pressure liquid refrigerant leaves the condenser, it passes through the dryer. The dryer is a small cylinder with desiccants packs inside. Its purpose is to absorb any water vapor or moisture in the refrigerant.
Water vapor in the air conditioning system of your car can damage the system and make it less efficient. Moreover, it can corrode the parts of the AC system and create a blockage, reducing the flow of refrigerant.
After the refrigerant exits the dryer, it will pass through the high-side service port.
The Expansion Valve
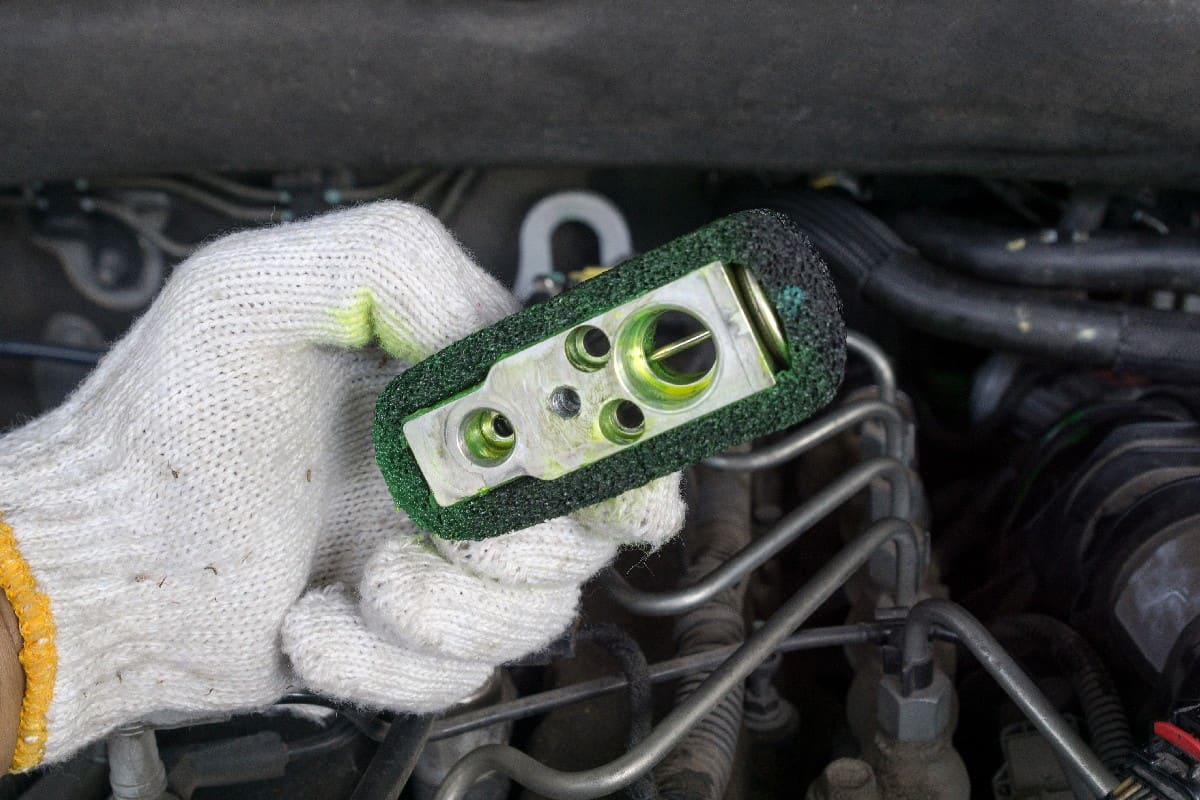
The expansion valve or the thermal expansion valve (TXV) is responsible for changing the refrigerant from a high-pressure liquid to a low-pressure liquid by allowing it to expand.
The expansion releases the pressure carried by the refrigerant.
If an increase in pressure brings with it a corresponding increase in temperature, a decrease in pressure will cause a corresponding decrease in temperature too.
Thus, the temperature of the refrigerant drops as it leaves the TXV. This is where the low-pressure side of the AC system begins.
Evaporator
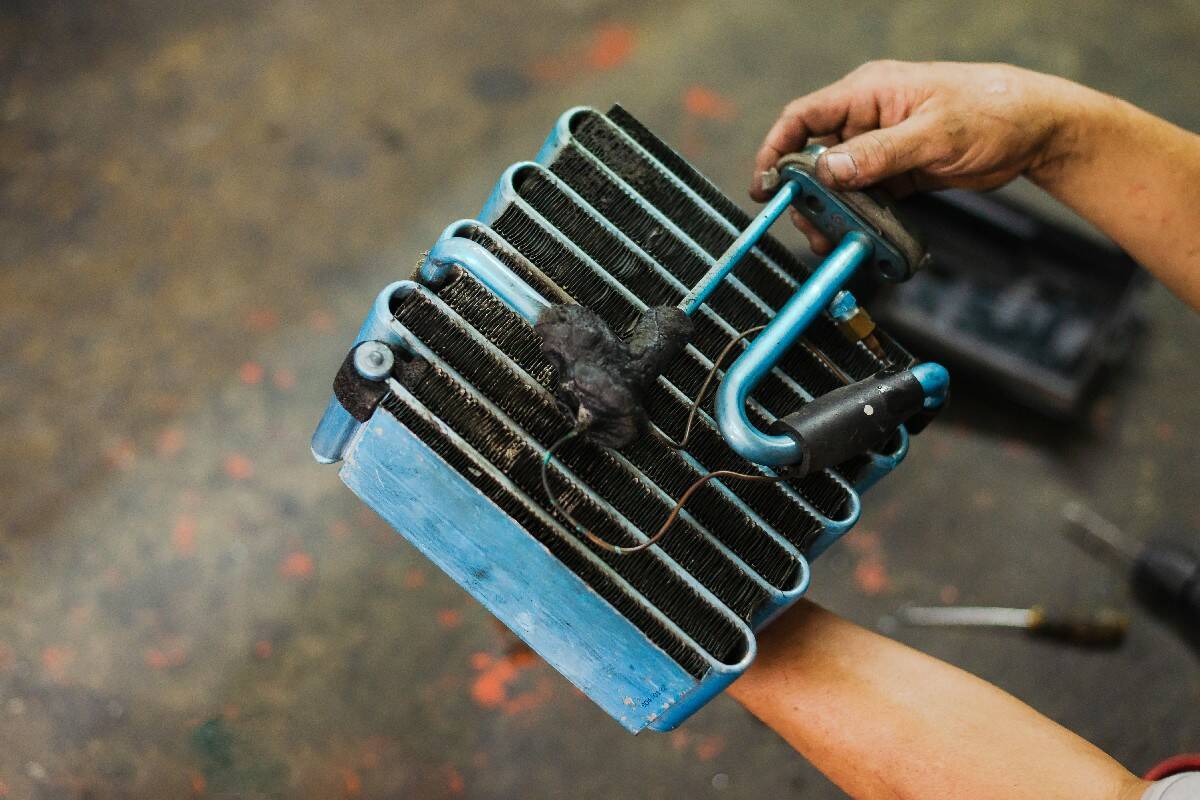
The evaporator is another component that looks like a small radiator.
The cold refrigerant passes through its metal pipes that have numerous thin metal fins. An electronic blower pushes warm air through the fins. The movement of warm air through the fins of the evaporator cools the air before it enters the cabin.
The warmth from the air transfers to the evaporator as it cools.
The rise of temperature in the evaporator causes the refrigerant to boil because it has a very low boiling point. This boiling converts the liquid refrigerant into a gaseous refrigerant as it leaves the evaporator.
The low-pressure gaseous refrigerant moves naturally into the compressor—passing the low-side service port.
The energy that creates the high-pressure gaseous refrigerant inside the compressor sucks in the low-pressure gaseous refrigerant, and the cycle repeats.
Where Do Refrigerant Leaks Come From?
The air conditioning cycle that cools the cabin of your car is inside a sealed system. The refrigerant shifts from a gaseous state to a liquid state without losing volume as it moves through the system.
However, the AC system of your car involves rubber connectors that become brittle as it ages. Once the material weakens, pinhole leaks will start to appear.
Additionally, the vibration from the engine can create weakness in the metal tubing that connects each AC component. Even the evaporator, the condenser, and the compressor can become prone to leaks as they age.
Additionally, the gaskets that seal the connections between these components age and wear and eventually fail.
Fortunately, as long as the leak is not severe, you can easily fix it by introducing a sealing compound into the air conditioning system.
How To Seal Leaks In An AC system?
Here are the complete steps that you can follow to seal small leaks in your car’s AC system.
Keep in mind that this method is not effective against large leaks. If your car’s air conditioning system has a large leak, it is best to have a mechanic verify and fix the issue for you.
Preparation Stage
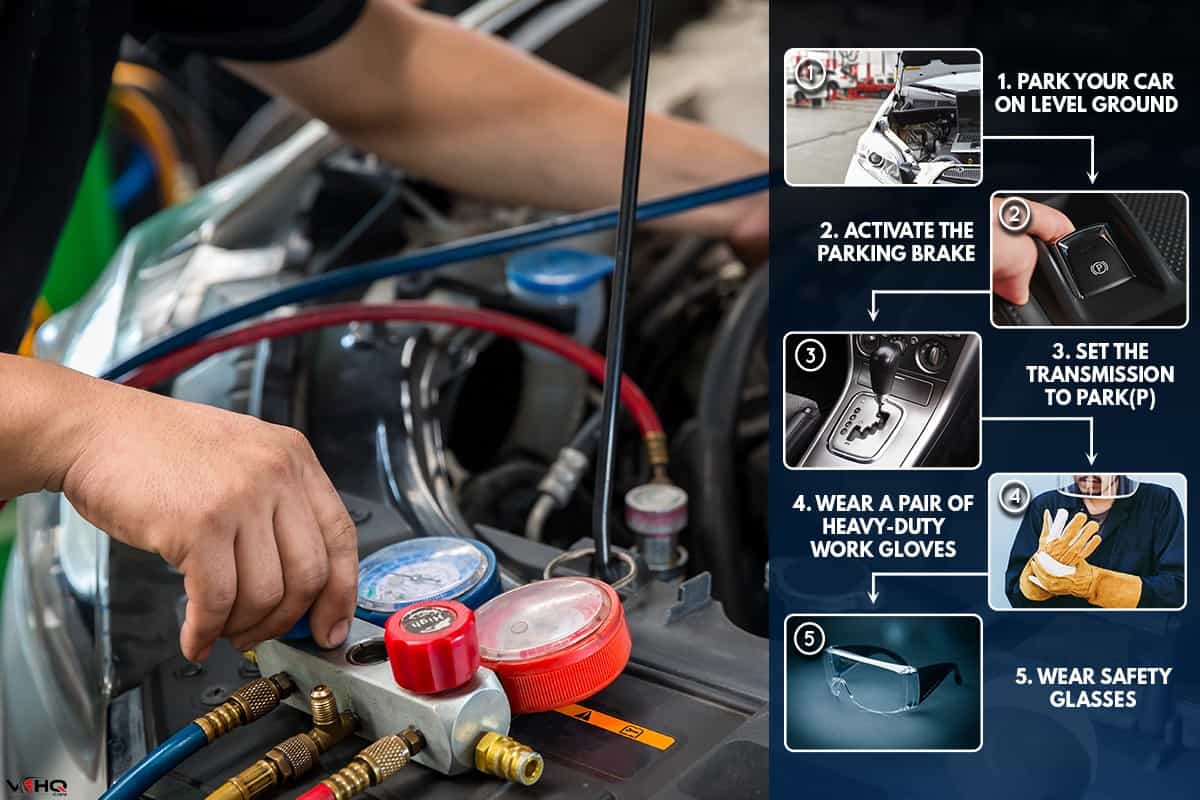
- Park your car on level ground.
- Activate the parking brake.
- Set the transmission to Park(P) if you have an automatic transmission or to first gear if you have a manual transmission.
- Wear a pair of heavy-duty work gloves.
- Wear safety glasses.
Connecting To The Low-Side Service Port
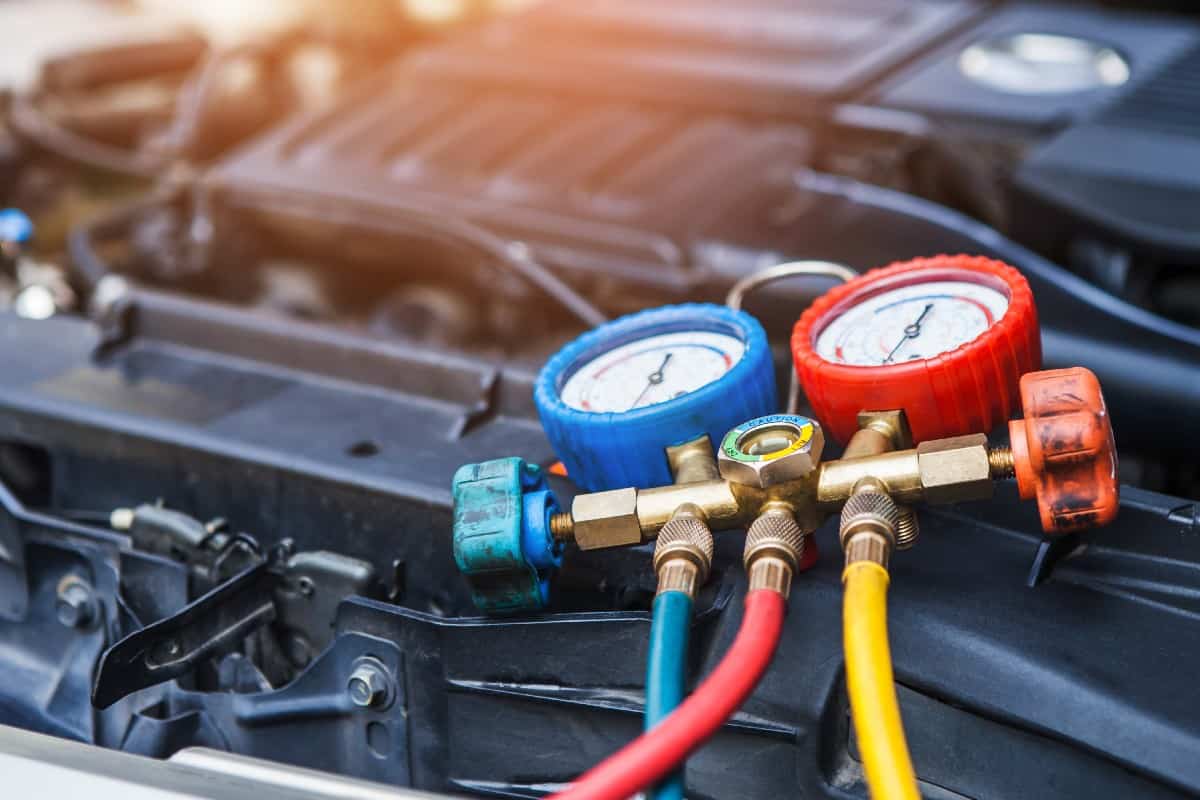
- Locate the low-side service port.
-
- The low-side service port is often on the larger metal (aluminum or copper) tubing.
- Check the metal tubing between the compressor and the firewall of your vehicle for a valve cap.
- Pick an AC leak repair kit that comes with a hose. If your kit doesn’t have this hose, you will have to buy a separate hose that will fit the low-side service port and the AC leak sealant.
- Check the hose and look for a pin inside one of the connectors on one end.
- Turn the valve handle on the hose counterclockwise to retract the pin. You want to retract the pin as far as possible.
- Attach the hose to the can of AC leak sealant. Screw the hose into the lid of the can to secure the hose on the container.
- Check the instructions on the can if you need to shake the can before using it. If you do, shake the can thoroughly before proceeding to the next step.
- Open the low-side service port.
- Connect the opposite end of the hose to the low-side service port.
-
- Tug the connector a little to make sure that it is snug and secure with the low-side service port.
- Turn on the engine and let it idle.
- Turn on the air conditioner and put it on the maximum setting. The AC fan should also be in the maximum setting.
- Check the compressor. The serpentine belt must be running smoothly through the compressor’s pulley. The pulley must be rotating without a problem. The compressor’s clutch should engage and disengage the compressor.

Red Angel A/C Stop Leak is available on Amazon through this link.
Introducing The Sealant Into The AC System
- Turn the valve on the hose clockwise. This will cause the pin on the hose to puncture the container.
- When the valve can't turn any further, turn the valve counterclockwise to release the contents of the can.
- Flip the can upside down and position it slightly higher than the level of the low-side service port.
- Shake the can from time to time to check if it is already empty.
- Once you finish transferring the contents of the can into the AC system, disconnect the hose from the low-side service port.
Recharge The System With Refrigerant
- Connect a portable AC refrigerant charger to the low-side service port.
-
- Pick a portable AC refrigerant charger with a hose and gauge.
- Check the connection between the charging can and the port.
- Press the release valve to let the refrigerant enter the AC system.
- Monitor the gauge on the charging can.
- Stop charging once the gauge shows the correct pressure.
- Disconnect the charging can.
- Cover the low-pressure service port.
- Let the engine run for at least 15 minutes more. This will give the AC leak sealant to work inside the AC system.

AC Pro R134A Refrigerant AC Recharge Kit is available on Amazon through this link.
Conclusion
You can use an AC leak sealant to seal small leaks in the AC system of your vehicle. If you have large leaks, the best solution is to take your car to a mechanic.
If you found this article helpful, you might be interested in these related posts: