Motorcycle chain maintenance is a crucial part of making sure your motorcycle rides nicely and performs well. Eventually, all motorcycle chains will need replacement, though. Working on your bike can be intimidating. However, with the right tools and some reliable instructions, you can learn to replace the chain on your motorcycle. We have done some research and compiled some answers to the most common questions about motorcycle chain replacement.
Replacing a motorcycle chain is a pretty simple process.
- Use a chain breaker tool to remove one of the links on the existing chain.
- Remove the old chain, and feed the new chain across your sprockets to get the new chain in place.
- Lubricate the new connecting link, and install it in the new chain.
We have also included some links to popular chain-breaking tools and rivet tools to help you get the job done. Read on to learn everything you need to know about replacing your motorcycle chain.

How To Replace A Motorcycle Chain
In today's world, there are many different types of motorcycles out there on the road. With a few exceptions, most motorcycles have chains.
Your motorcycle chain will need to be replaced about every 10,000-20,000 miles depending upon what type of chain it is and what kind of riding you're doing. The average motorcycle lifespan is roughly 12 years or 40,000 miles. This means you will need to replace your chain at least once or twice throughout its lifetime. Learning to do this job yourself will save you some money. Additionally, many people find working on their motorcycle to be highly rewarding.
The chain is part of the drive system. It transfers power from the transmission to the rear sprocket, which causes the rear wheel to rotate. When the chain wears out, it is less effective at transferring power. This results in not only a drop in performance but also an increased risk of an accident.
The signs of a worn-out chain are pretty visible, which makes it easy to tell when your chain needs replacing. A worn-out chain will be looser and have a lot more movement on the sprockets than a new chain would.
Once you determine that your motorcycle chain needs replacing, you can easily do this job yourself. You will need some special tools to accomplish the task of changing out the chain because most motorcycles have endless chains. An endless chain does not have an easily removable master link.
How Do You Use A Motorcycle Chain Breaker?
The first step to changing your motorcycle's chain is to remove the old chain.
To get the old chain off of your motorcycle, you will need a chain breaker tool. A chain breaker tool does just as its name implies. It breaks the continuous chain made by the interconnected links. Break the chain by pressing out the pins of an existing relationship on the chain.
A chain breaker tool is a type of manual hand tool. They are relatively inexpensive.

Check out this chain breaker tool on Amazon.
Using a chain-breaking tool is simple. First, install the tool over the pin that you would like to press out. Then, turn the handle to increase pressure on the pin. Once you apply enough pressure, the pin will break free and be pushed out of the link. After the first pin is loose, repeat this process for the other pin in the link.
Now that you have both pins removed, you can get the old chain off the motorcycle. You can use the old chain to make installing the new chain easier. Before removing your old chain from the sprockets, use the new connecting link to attach your new chain to the end of your old chain. Next, pull on the free end of the old chain, and use it to feed the new chain onto the sprockets. Once the new chain is in place across both sprockets, remove the connecting link from the end of the old chain.

Here is another chain breaker tool available on Amazon.
How Do You Rivet A Motorcycle Chain?
For the next step of this process, you may need another unique tool depending upon what type of connecting link you have.
There are two types of connecting links: rivet type links and clip type links. Many people argue that rivet type links are superior to clip type links. In this post, we will be discussing rivet type links.
You can buy a special tool kit that you can use as both a chain breaker and a rivet tool.

The Process of Riveting the Pins
- First, place a washer onto each pin of the new connecting link. Then, put the new link into the chain so that the open side is facing away from the motorcycle. Install the final two washers on the other side of the pins.
- Next, install the press plates onto the chain tool. Once installed, press the link plate onto the pins until it lines up with the plates next to it.
- Once the plate is in place, install the riveting tip and anvil onto the chain tool. Before making any rivets, use a caliper to check the diameter of the other rivets on the chain. You will need to make your new rivets the same size as the existing rivets.
- Using the chain tool with the riveting tip and anvil installed, press the end of each pin a little at a time to create rivets. Check the size of the new rivets periodically to make sure you do not make them too big. After you have finished your first rivet, create the second rivet on the other pin.
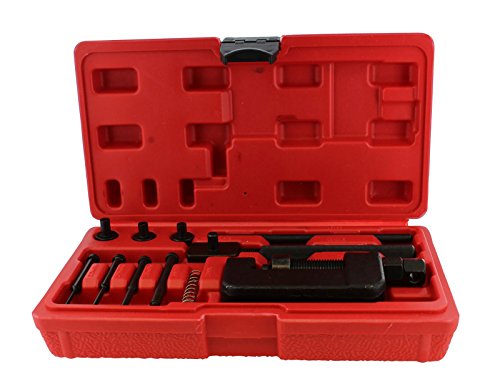
Click on this link for another example of a kit that is available on Amazon.
Check out this video to see the whole process in action:
Are Motorcycle Chains Universal?
The concept of a universal motorcycle chain sounds great, but it is simply not a reality. Bigger, more powerful bikes will have different chains than smaller, less powerful bikes. This is not only true for chains but also for sprockets too. Many things change from motorcycle to motorcycle.
Consult your owners manual to make sure that you get the correct replacement chain for your motorcycle. If you do not get the right chain, it may not be long enough, or even fit onto the sprockets of your bike.
How Much Does It Cost To Replace A Motorcycle Chain?
Replacing a motorcycle chain can be a relatively inexpensive process. This is especially true if you do the work yourself.
The chain will cost anywhere from $75 to $250 depending upon quality and type.
A master link to connect the two ends of the chain will be somewhere in the ballpark of $10.
Buying a chain tool kit will be around $25.
If you don't already own a caliper, you can buy a cheap digital one for about $10.
All in all, you should be able to get this job done yourself for under $300. If you opt to take your motorcycle to a professional technician, you can expect to pay for labor in addition to parts that will increase the price. While this is a pretty quick and straightforward process, many technicians will have a flat labor rate for jobs that take less than an hour. Also, keep in mind that there is often a markup on parts and materials when someone else is supplying and installing them.
In Conclusion
Changing out your motorcycle chain can be a really easy task with the right tools and information. Chain maintenance is essential to reduce the need for frequent chain replacements. Clean and lubricate your chain regularly to maintain good chain health. Your owner's manual will be a good source of information on how often you should perform chain maintenance, and what you should buy when the time comes to replace your chain. While you're doing regular chain maintenance, check your chain for wear and tear. Remember, having a well-maintained bike is the first step to safe motorcycle riding.
I purchased this Park Tool CT-5 Mini Chain Brute as a replacement for a 20-Year Old Park Tool that finally became too-stripped to use. This is the perfect chain tool. It’s made of quality metal and can accommodate almost any bike chain type with a 1/8-inch width, including the 12-speed chains of Shimano’s XTR and SRAM’s AXS models. It also fits single-speed chaining and bicycles with 5-speed to 12-speed systems. This product comes with an integrated shelf for loosening the super-tight and stubborn chain links of older models. It will stand up to daily use, but it is small, weighing only 2.4 ounces, and light enough to put in your backpack for emergency use while riding.
This chain breaker is an excellent addition to one’s EDC. It is compact and lightweight while giving bikers the performance reliability they need from a chain breaker.
Replacing, or breaking chain links or pins with roller chain breakers lead to the best results and prevents damage.