Did you drop something in the gap in the center console, and now you need to know how to get it back? You’ve come to the right place, for we have researched this question, and we have the answer for you.
The only way to retrieve lost items under the dashboard is to remove the dashboard first.
Let’s talk more about the gap under the dashboard in the succeeding sections. Learn about how to remove the dashboard to retrieve any lost items through the gap and how to seal it in the sections below.
Read on!
The Dashboard Evolution
A dashboard—also known as the dash or the instrument panel—is a common feature in most vehicles. It serves as the control panel and a location for instrumentation display.
Common dashboard designs place them in front of the driver. This is where they can easily view important information from the instruments.
Very early dashboard models were single wooden boards that protect the driver when mud starts to fly from the horses' hooves. This initial design is perhaps where the dashboard got its name.
Dashboards became more complex as vehicles become more advanced. The 1990s saw a major change in the dashboard design when airbags became a standard component of all vehicles. Vehicle designers hid the airbags behind the steering wheel and behind the front dashboard of the passenger’s seat.
Modern dashboards are no longer made of wood, although wood trims are part of most elegant car interior designs.
A myriad of buttons now accompanies the steering wheel, including levers and rollers for navigation and volume control. Most of the entertainment controls on the dashboard now have a corresponding button or lever on the steering wheel.
Recently, digital dashboards have become an option as well.
Drivers are now fed information that they need to see when they need it. Advanced dashboards like the one in the new Mustang allow drivers to customize the information that they see in their dashboards.
The dashboard display on the upcoming 2024 Mustang integrates the Unreal gaming engine. It is the same graphic rendering engine in popular games like Gears of War, XCOM: Enemy Unknown, Deus Ex, Mass Effect 2, and Star Wars Jedi: Fallen Order.
The Tesla Model 3 has nothing in front of the driver, moving all instrumentation display on a massive 17-inch display at the center of the car.
How to retrieve lost items under the dashboard?
Some newer expedition models have a horizontal opening at the bottom center of the dashboard, right where the wireless charging port is located.
The wireless charging port has a cover with two tabs. The first tab is small, white, and has the “Sync” label in the middle. The second tab is wide and tall and serves as the handle of the cover.
When the cover is open, these two tabs slide into the gap, almost covering the gap completely. However, if you close the cover of the wireless charging port, the gap under the dashboard will be open. In this state, items can slide into the hole and fall into the back of the dashboard.
If you place a small object in that area and you suddenly step on the brakes, your item will likely slide into that horizontal hole into dashboard limbo—until you get the item back.
The size of the gap varies from trim and year model. There are trims and year models where the gap is barely big enough to fit the ends of an iPhone charger cable, while there are trims and year models where you can lose your iPhone in that gap.
At present, there is no direct access to the items that you will lose through this hole. Thus, the only way to get them back is to remove the central dashboard.
If it’s just a few coins or candies going into that hole, you might not bother to get them back. However, it would be a good idea to look for a way to seal that hole after the first time that an item gets lost in it before you lose anything important.
If you lose an important item in that gap—like your Expedition key fob—you can follow the steps below to remove the central dashboard.
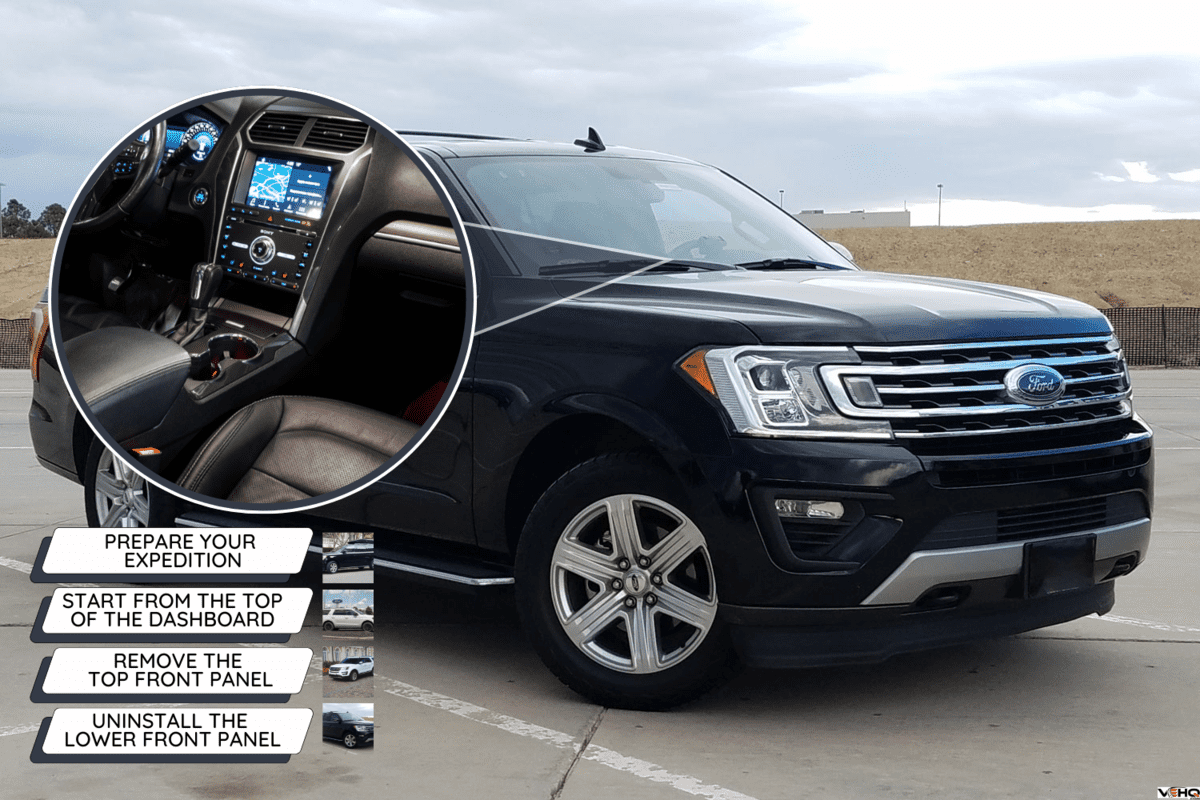
Preparing Your Expedition
- Park your Expedition on level ground.
- Activate the parking brake.
- Place the gear shifter in Park(P).
Starting From The Top Of The Dashboard

- Pry off the rubber tray liner from the dash tray on the top of the dashboard.
-
- In some trims, there is a speaker in the dash tray close to the windshield.
- The speaker cover does not have any screws. Use a plastic trim remover to pry the cover from the small speakers.
- The bolts that you need to get to are under the speaker cover.
- Under the rubber tray liner is a pair of bolts. Remove these two bolts.
- Use a plastic trim remover to pry off the dash tray. There will be a couple of retaining clips that keep it in place opposite the bolts that you took off.
-
- Using a plastic trim remover helps prevent damaging the dashboard. When you use a screwdriver to pry the top of the dashboard, the screwdriver will dig into the plastic material of the dashboard.
- If you have a small speaker here, you need to disconnect the wire connector that goes to the speaker before you remove the dash tray. Press the lock to release the wire connector.
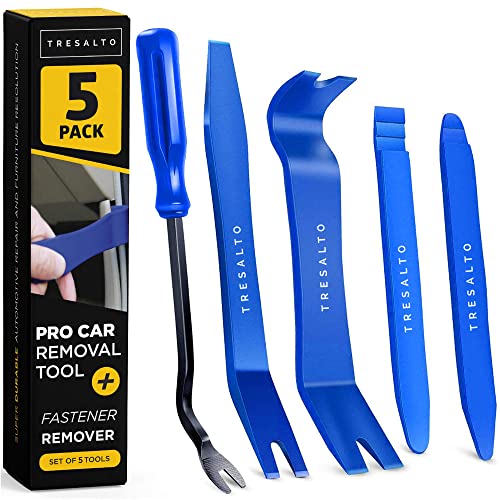
Tresalto Auto Trim Removal Tool Set is available on Amazon through this link.
Removing The Top Front Panel
- Remove the two screws or bolts that hold the top front dashboard in place. This is the panel that holds your infotainment in place. These screws might not be immediately visible because they are behind the top bezel, hidden from direct view. Look down at the hole left by the dash tray, and you will find these two bolts close to the front panel.
- Use the plastic trim remover to pry the front panel off the rest of the dashboard.
- Pull the top front panel carefully.
-
- If you apply too much force when removing the top front panel, you could end up pulling the wire harnesses too much and damaging them.
- Unclip the two wire connectors at the bottom of the top front panel. Pry the connector lock to release the wire connectors and pull them off one by one. The smaller connector usually has a bottom lock that you need to pinch with your fingernails to release the lock.
- Gently pull the two wire connectors from the top of the top front panel. Push the two locks on the sides towards the center to unlock the connectors.
-
- Remember the position of these wire connectors for when you need to put them back together once more.
- In some models, there are three wire connectors at the top of the front panel with the same connector locks and three wire harnesses at the bottom.
- Set the top front panel aside.
Uninstalling The Lower Front Panel
- Remove the two bolts that are holding the lower front panel in place.
- Use the plastic trim remover to loosen the two side trims. You don’t have to remove the two side trims. Just loosen them.
-
- The two side trims hold the lower front panel in place.
- Loosening the two side panels will make it easier for you to pry off the lower front panel.
- The two side panels go from the top of the center panel to the bottom.
- Pry the bottom panel off.
- Reach for the items that you lost through the gap.
Closing The Gap
The permanent solution to the problem of items falling into the gap under the dashboard is to seal the gap itself. is to seal the gap under the dashboard.
The easiest way to seal the gap is to permanently keep the cover of the wireless charging port open. The SYNC tab and the handle will block any object that gets into the gap. Additionally, since the charging port is open, any object that gets to that area will fall into the charging port cavity instead of falling into the gap.
When you decide to go this route, close the wireless charging port door before putting the dashboard back together. Lock the wireless charging port door by screwing it into place. A screw is better than adhesive so that you can still remove it when you need to uninstall the dashboard.
Another method is to use black weatherstripping.
Get weatherstripping with a hollow center. Trim a piece that will follow the shape of the top hole. Once you complete trimming the weatherstripping, attach it to the bottom of the dashboard using the adhesive of the weatherstripping.
Trim another piece of weatherstripping that will cover the length of the rest of the gap. Once you complete trimming the second weatherstripping, attach it over the wider gap.
This solution will still allow you to close and open the wireless charging port’s cover. However, it will no longer go all the way into the gap like before.
The two hollow weatherstripping layers will block any item that gets to that area.

VITAM AMO Weather Stripping Seal is available on Amazon through this link.
Conclusion

It is necessary to remove the central dashboard to retrieve the items that you lost through the center gap of the dashboard.
If you enjoyed reading this article, you might find the articles below equally enjoyable to read: